F L E M I S H P A P E R S
Designs made from wood blocks
hand cut by Grant O’Brien
See the important links at the bottom of this page.
LAYING THE PAPERS
Preparation OF THE SURFACES FOR GLUING
The surface onto which the papers are to be glued needs to be clean and free of oil and grease. Before gluing on the paper, the surface should first be sized with thin glue or with thinned shellac so that all of the glue applied to the paper isn't sucked into the wood. All of the paintwork to the case sides, mouldings, lid edges, etc should be done before the papers are glued in place. This means that, in some cases, the papers are at least partly glued over a painted or shellacked surface. Originally the mouldings on Flemish instruments were varnished with shellac. The top edges of the mouldings, parts of the mouldings on the inside of the lid, the edges of the main section of the lid, etc were painted black. I'm not sure exactly what the procedure for using this particular black paint was, but it is clear from the extant instruments that the black paint was applied first and then both the black-painted surfaces and those with clear shellac over plain wood were all covered in shellac at one and the same time. Clearly the black paint was not soluble in the alcohol used as the solvent in the shellac. I have simply used a black water-based ink to do this job. As this ink is not soluble in the shellac it is not picked up by the brush and does not run or bleed into the areas of clear shellacked wood. Be warned: most modern waterproof inks contain shellac to make them waterproof. Therefore if such inks are used they dissolve in the shellac used over them and bleed into the plain shellacked area. An unsightly mess is the result! A good solution which I have used is to make my own ink from a good black powdered pigment mixed with gum arabic. This can be 'painted' over the areas which need to appear black underneath the shellac. Another possibility would be to use a Japanese ink sticks. These are available from any good artist's supply house. Traditionally, ink is made from these sticks by rubbing the end of the stick against a special type of wetted stone. This is time-consuming and laborious but it produces a dense opaque black that is not soluble in the alcohol in the shellac mixture.
I have found that the best technique for shellacking the flat and moulded surfaces is to use normal French-polishing techniques. This produces a beautifully smooth finish with a great deal of depth. When all of the surfaces have been painted and shellacked, and the background to the papers has been sized, the papers can be glued to the desired surfaces.
PREPARING THE PAPERS FOR GLUING
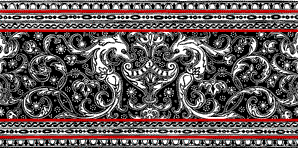
The papers are supplied in sheets or strips. You will have to work out from the size and shape (these are all given on the Catalogue Page) of the area you want to cover on your instrument how many sheets or strips you will need. May I suggest that you order a few spare strips or sheets so that you are not left short if you damage or spoil some of the papers. Most of the papers come with extra lines or patterns at the top and bottom, some or all of which will need to be cut away and remain unused depending on the size of the area you need to cover.
But before you cut away the lines or patterns to width you need first to cut the strips to length.
Each strip or sheet is marked along the top and bottom edges with cut marks which can be used to cut the strips and sheets accurately so that the patterns 'flow' from one to the next. I have been particularly careful when cutting the blocks to make sure that the patterns 'match' at both ends so that they flow from one pattern to the next in exactly the same way that wallpaper patterns match at the joins. I know that the craftsmen that cut the blocks for the Flemish makers and the workmen in their workshops were not terribly fussy about this, but I have tried my best to make the patterns flow properly. These cut marks are shown below for the O'Brien Pellegrino 3 pattern:
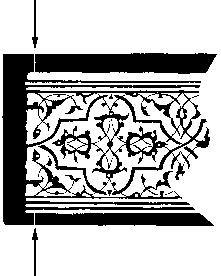
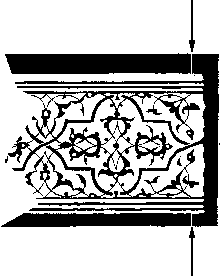
The ends of the papers should first of all be cut to length by cutting through the centre of these cut marks at the top and bottom and at the left and right-hand ends of each of the sheets or strips. When you cut the ends of the pattern in this way, the pattern then flows seamlessly across the join like a single continuous strip. The effect is shown below:
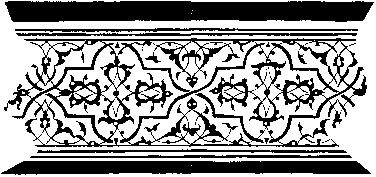
Once the ends of the pattern are cut at the cut marks, the top and bottom of the strips can then be cut away according to the space that the strips have to occupy on your instrument.
GLUING THE PAPERS
Historically the Flemish papers would almost certainly have been glued to the instruments using hot animal glue. This was a glue composed almost entirely of gelatine obtained from boiled animal hide and bones. This glue now comes with many names: cake glue, Scotch glue, pearl glue, hot glue, wood-workers glue, animal glue, etc. It could be replaced by any gelatine glue or even wallpaper paste which is just an artificial gelatine glue. If you decide to follow tradition and use hot animal glue, then the glue powder or pellets should be completely dissolved in warm water (about 60-70º Centigrade or 140-160º Fahrenheit). Put the glue in the bottom of a transparent glass jar to a depth of about 1cm. Add warm water to a depth of about 1cm above the top surface of the glue. Keep the mixture warm and covered for about 2 hours before use, and stir it frequently to dissolve all the solid glue. Do not keep the glue at a temperature higher than 60-70º Centigrade or the glue will deteriorate and loose its excellent adhesive properties. Use a 25-50mm brush to paint the glue onto the back of the papers with a fresh piece of protective newspaper underneath each sheet or strip of paper being glued in place.
Modern paper restorers and conservators would probably recommend the use of starch paste instead of animal glue to glue the papers in place. Starch paste is much more controllable in its composition, and is always of neutral pH, with none of the possible contaminants that are of no consequence in gluing wood, but might be deleterious when used to glue the paper patterns. I have not used this method myself and have always followed the traditional approach and used hot animal glue. If you want to be sure of the composition of your glue and follow the modern route, then numerous recipes for starch paste glue can be found on the internet. Starch paste can also be bought ready-made and is available on-line (try Hewitt's B36 starch paste powder in the UK for example, or try the starch paste recipe below).
Other glues may be suitable, but make sure they have the correct properties before using them. Do no use PVA glue as it creeps. Other artificial glues may also creep after the paper is applied. Some glues may also have have a significant acid content and destroy the neutral pH properties of the paper and cause deterioration or discolouring in time.
Make sure that all parts of the back of the paper are well covered with glue. Once covered uniformly with glue apply the paper quickly to the surface where it is to be fixed, and position it carefully. Once the paper pattern has been correctly positioned on the surface it should be pressed on its upper surface to ensure good contact. The best way to do this is to use a roller and roll it over all parts of the pattern. Using a roller has the advantage that it presses the paper against the surface without pulling or stretching it. The paper can also be pressed using a large metal (not silver!) spoon or other smooth object, but great care must be taken not to tear the paper which has a lower tear strength when it is wetted with the glue than it does when dry. Pressure should be applied to the large 'silk' pattern by rolling it towards the middle of the pattern to ensure that the paper itself is not stretched during the gluing process thereby increasing the tension in the paper after it dries (and thereby increasing the tendency of the wood and pattern to bend as a result of the internal tension in the paper - see the section below on the expansion of the papers). Bubbles of air trapped below the paper can be removed by pricking the bubble with a sharp pin. Excess glue squeezed out from underneath the paper or applied accidentally to the top of the paper can be removed by wiping the surface carefully with a clean damp cloth. The papers supplied here have a good wet strength and so can be cut to the exact length required (for example a the ends of the keywell in a harpsichord) after they are glued in place. Once the cut is made the excess paper can be peeled away and the glue underneath it wiped away with a clean damp cloth. (Don't worry about the cut mark as it will be covered over with the red-painted border around the paper.)
Keep your hands scrupulously clean while you're glueing the papers in place. Every time you're aware that there's glue or dirt on your hands wash it off immediately. Once you have glue on your hands they will pick up dirt and muck from everywhere and it will then stick onto the papers. Have a basin of clean soapy water and a towel by your side to use each time you get glue or dirt on your hands. If possible don't let any glue from your hands get onto the top surface of the paper at all. It is much better to avoid glue and dirt from the top surface of the paper than to have to deal with it after the papers have been soiled and laid in place.
Although the papers do have a good wet strength and resistance to abrasion, they are particularly vulnerable just after gluing. Therefore do not use an eraser on them immediately after gluing and wipe off any excess glue from the top surface with care - otherwise you risk removing the top inked layer from the paper and destroying the pattern itself.
One of the narrow strip patterns is normally used as a border to the 'silk' pattern (O'Brien Type 1) in a harpsichord lid. The border to this paper has to be 'bent' around the curve of the bentside edge of the lid. The narrower this border paper is, the easier it is to 'bend' it. Therefore O'Brien Type 9, the narrowest of all the designs, is the pattern of choice for this purpose. (Just so you don't mistake it, this is also the pattern used at the top of each page of this website!) As it is quite narrow and as the papers are a bit flexible anyway when wet, this pattern can, to a limited extent, literally be bent along the bentside edge of the lid 'silk' paper where the radius of curvature is quite small. Where the curvature becomes more acute, tiny wedges can be cut out of the pattern during the gluing process in places where there is no printed pattern. The wedge-shaped gaps left can then be closed up in such a way that the pattern appears to be continuous and curved uniformly along the edge of the 'silk' pattern.
We can supply pearl or Scotch glue on request. Just let us know - but order it with the papers and not afterwards, please!
STARCH PASTE RECIPE.
Put one tablespoon of wheat starch into a small microwave-safe bowl and add 5 tablespoons of distilled water. Microwave the mixture on 'High' for 20 seconds, remove from the microwave and stir it thoroughly with a plastic or wooden spoon. Repeat this procedure about 4 times until the paste is thick and translucent (the recipe is based on a 650W microwave oven). Let the paste stand to cool and then force it through a plastic sieve. The starch paste can be stored in a plastic container in the refrigerator. To use, dilute the paste with water. This makes a small amount for immediate use.
It will keep for a few days in the fridge.
EXPANSION OF THE PAPERS DURING GLUING.
When the paper becomes wet during gluing it expands slightly. This has a number of important consequences:
-
Strip patterns often need to be glued around an inside corner - for example in the keywell or soundwell of an instrument. It is a good idea to fold the paper beforehand at the point where the strip needs to go around the corner so that it stays glued right into the inside of the corner. The fold in the paper should be made a bit short of the actual position of the corner so that, after the paper is wetted with glue, the fold occurs exactly at the position of the corner after the paper has expanded. The papers expand by about 0.8%, so the fold should be made a distance of about 0.8% short of the remaining distance from the last strip to the corner.
-
When cutting the patterns used as borders to the 'silk' paper, the patterns will be slightly too long after wetting with the glue than what is required at the point where the mitred corner joins have to be made. However, as the glue does not dry instantly the second strip can be laid over the first and the mitre cut after the second pattern is glued down. The excess corners can be carefully lifted away and the mitred edges of the join pushed together so that they match perfectly. Any remaining glue can be wiped away with a soft cloth moistened in water. Remember that it is better to leave the papers slightly overlength and to then cut the papers to length after gluing them to the surface wiping away the remaining glue with a moist cloth. I like to make the pattern flow across the mitre by carefully choosing the point at which I start the strip around the corner from the mitre. This inevitably results in the last mitre you make where the pattern does not flow! The Flemish makers did not seem to bother about this at all!
-
The papers are obviously in tension after they dry as they try to return to their dry length. Since they are firmly glued in place and neither animal glue nor starch paste creeps this does not result in a gap between the glued patterns. BEWARE! SOME MODERN GLUES DO ALLOW CREEP AND THIS INEVITABLY RESULTS IN GAPS FORMING BETWEEN THE STRIPS OR SHEETS AFTER THE GLUE HAS THOROUGHLY DRIED. Do not use modern glues unless you are absolutely certain of their properties.
-
Since the papers are in tension after gluing, they can exert considerable tension in the surface to which they have been glued. This can cause warping of the wood after the papers have dried out, for example in the main lid and front flap of virginals, or in the main lid section in harpsichords. When gluing the 'silk' pattern and its associated borders to a virginal lid, for example, it is a good idea to wet the surface to which the paper is to be applied for at least a day beforehand. The lid panel will then warp through expansion in the opposite sense to that caused by the drying out of the papers. It is a hit-or-miss process, but it is always better to take some steps to avoid the problem than to do nothing at all.
PAINTING AND DECORATING THE PAPERS
After the papers have been laid and glued in place and allowed to dry, they can be decorated. The lid papers, front flap papers, jackrail and keywell papers are all decorated. Only the soundwell papers are not decorated after they are applied. The papers have all been sized so that neither ink nor water-based paints will 'bleed' along the fibres of the paper. Any guide or marking-out lines or marks should be made very, very lightly with a soft-leaded pencil and, after they have served their purpose, should be erased with extreme care so as not to remove the ink and the top surface of the paper underneath them. Typical examples of the decoration of the papers can be seen in the section Hints on decorating the papers after they are laid. Black ink can be used for the lettering and lines, this time preferably of the type containing some shellac to make it waterproof (but don't then use an alcohol-based varnish over the top of it!). A flat black paint could also be used. The red lines should be in a sombre red colour - vermillion red mixed with a bit of green or green umber to tone it down a bit works fine. The raised arabesques found on some Flemish lid papers can be imitated using toned-down vermillion powdered pigment mixed with PVA medium.
After laying and decorating the papers need no further treatment. Although some of the Flemish instruments have varnished papers, there are many more that do not and it seems almost certain that they were originally not given any additional protection. Despite the lack of any surface treatment, many Flemish instruments have today survived for 350 years with their papers intact and in good condition!
Catalogue of the available hand-made Flemish papers.
Prices of machine-printed Flemish papers.
Prices of hand-printed Flemish papers
How to pay for the Flemish papers you have ordered
Hints on laying the Flemish 'silk' paper (O'Brien Type 1)
Hints on decorating the papers after they are laid.
The 'Vermeer' paper (O'Brien Type 15)
Drawings are available some of which show how to decorate the papers after laying
The Ruckers book has been re-published by CUP. Buy a copy signed by the author
Return to the main page of this section